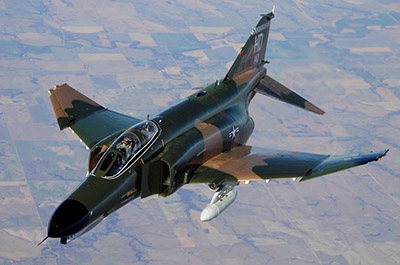
 The F-4 Phantom II (photo: www.nationalmuseum.af.mil)
The F-4 Phantom II was one of the most versatile fighter aircraft ever built, serving variously as an air-to-air interceptor, general-purpose fighter/bomber, reconnaissance jet and “Wild Weasel” anti-SAM ground attack plane in nearly 40 years of service with the U.S. Armed Forces. After debuting with the Navy in 1960, it was quickly adopted by the Air Force and the Marines, and endured as one of the more memorable military icons of the Vietnam War era. The F-4 even saw combat action as late as the 1991 Gulf War, and remains in service in some foreign air forces even today.
The story of how one half of Digital Check got its start began with the F-4, when a small spinoff of the Wollensak projector company called Optical Systems Technology (OST) found a way to use the world’s first-ever electronic film movement device in a state-of-the-art flight simulator for the Air Force.
Before we go too far, it’s important to gain some perspective on how early flight simulators worked. There was no such thing as a computerized flight simulator: Computers as we know them didn’t exist. Certainly, there was nothing advanced enough to perform even the crudest of polygonal renderings in real time – the minimum requirement for a software-based simulation.
So the whole thing had to be done with film, which naturally leads us to another question: How do you make a flight simulator using reels of film? You’d expect the outcome to be more like a movie than a simulation. But with a powerful projector and a few optical tricks, Digital Check’s predecessor OST and a company called Link Aviation were able to figure it out.
To make a passable simulation, first a “mission” would be filmed using cameras mounted on a real plane, with landmarks and features visible to navigate by. These missions could cover anything from standard takeoffs and landings, to more advanced fare like patrols and ground targeting maneuvers.
Once the mission was filmed, the first visual trick came into play: The footage was shot on 70-millimeter film, so the picture was much wider than the actual viewing area of the simulator. Since only part of the frame was actually shown on the screen at once, you could give the appearance of turning in mid-flight by moving the lens toward the edge of the frame, while a complex system of prisms and anamorphic lenses stretched the image to keep the proper perspective.

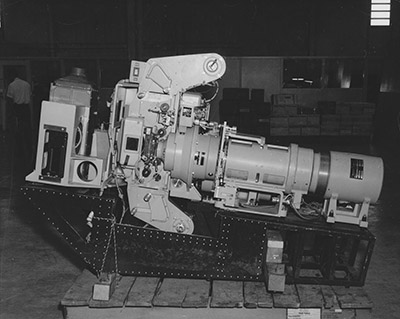
The VAMP F4 Flight Simulator. OST’s projector can be seen in the middle (no reels of film attached), and the system of lenses and prisms for manipulating the image extend to the right. Photo: Digital Check
In this way, they were able to simulate a “tube” about a mile in diameter with accurate yaw, pitch and roll that responded to the controls. Stray too far outside the intended flight path, and you’d hit an invisible wall, and the picture would begin to stretch out of perspective to let you know you were going off-mission.
That took care of steering the plane, but there was another issue to address: How to simulate acceleration and deceleration. Projectors at the time almost universally ran at a fixed speed, or occasionally employed a handful of pre-set speeds that had to be adjusted while the film was stopped. Obviously, neither of these could make the picture on the screen respond to the pilot’s commands in real time.
The device built by OST solved that problem by doing something no other projector had ever done before: Using an electronic controller and specially designed motors to synchronize the film speed with inputs from the simulator. When the pilot pulled back on the throttle, the film sped up to give the appearance of acceleration; some later models even employed hydraulics to produce the real sensation of increased g-forces in the pilot’s chair. That may not sound too impressive today, but it was a BIG DEAL in the analog age.
Now, speeding up and slowing down film may sound simple enough – but to use film for simulating the kinds of things a jet fighter did, what you needed was no ordinary motor. The reels on the F-4 simulator could go from zero to 5,000 rpm – in either direction – in two milliseconds, which was much less than the time it took to play a single frame. At top speed, the film could be traveling faster than 30 mph, so keeping it on the sprockets without tearing it presented another serious challenge.
Considering that flight simulators of the day used massive reels of film costing up to $20,000 apiece, this was no trivial concern. But the OST’s sprockets and drive system were so precise that they allowed the system to operate with virtually no wear. Part of this was due to the fact that the motor did not actually “roll” the film like other projectors’; it came to a full stop after each frame, as many as 100 times per second. This meant the speed could be changed – or even reversed – instantly between any two frames without straining the film.
The other big film-related challenge was the size of the reels themselves. When you go to the movies (at least, when you went to the movies in the past, before theaters had digital projectors), a full-length feature film didn’t come on one big reel. It would be too heavy and too unwieldy for an ordinary projector to handle. So instead, movies would be broken up onto several smaller reels; the projectionist made sure they were switched over at the appropriate time, and the show continued without missing a beat.
In flight simulators, that wasn’t possible; the whole mission had to be on one reel. And since they were using 70mm film, one reel could run up to 5,000 feet long. So, not only did the motors have to be strong enough to turn the colossal wheels, but there was a huge premium placed on the ability to skip forward and backward quickly without dismounting the rolls. To fast-forward or back up an entire reel at a regular projector’s pace might take half an hour or more. But the military’s machine could get to any part of a mission within a minute or two.
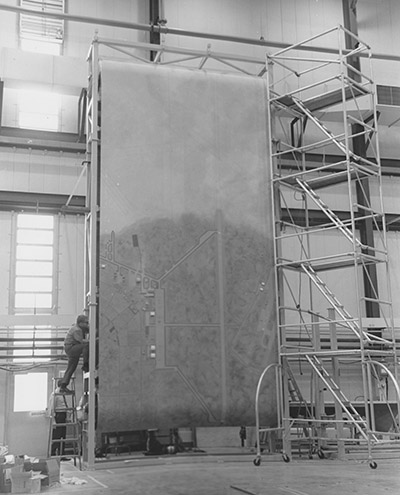
 Scale-model flight simulators with mounted cameras eventually replaced film-based simulators until digital technology became viable for the purpose. Photo: Digital Check
By the late 1970s, film-based flight simulators were falling out of favor with the military – not because computers were replacing them, but because the films themselves were becoming increasingly complex and expensive to produce. Simple externally-mounted cameras gave way to ever more-complicated systems for improving picture quality; by the end, film crews were even doing things like flying helicopters with cameras suspended in buckets of mercury to keep them level. Needless to say, the cost of producing films with such extravagant techniques grew to be tremendous.
So gradually, the projector-based simulator gave way to the types of camera-model systems seen here, with scale models of entire airports and small cities crafted by artists and fixed to a movable canvas surface. These were incredibly detailed and fascinating creations in their own right (and also weren’t cheap to produce).
The picture on the pilot’s screen was a live feed from a camera mounted on an adjustable gantry system above the canvas. The controls in the simulator changed the angle and height of the camera, and the entire model city was scrolled past it on giant drum rollers to simulate the airspeed of the plane.
The new system had the advantage of a free-moving camera, so missions weren’t restricted to pre-set paths; on the other hand, the handmade sets were also extremely expensive to build, and keeping the edges of the canvas from slipping off the rollers was a constant concern. Nonetheless, this became a common method for pilot training until computer-generated visuals advanced enough to become a viable replacement.
OST’s involvement with simulations didn’t end there, though: After the F-4 project, the same film-based system was used for a Boeing 747 flight simulator, a Southern Pacific Railroad locomotive simulator, and a training simulation for Skylab’s Apollo Telescope Mount. And in one of its more unusual uses, the technology was even put to work underground for a coal mine simulator.


